In order to easily insert links (of various types)
in your page, use the Link/Hyperlink Picker
button from the toolbar:
The button has two areas on which you can click: the button icon (image)
and the arrow on the right. You can link your page to other site pages,
to external sites, to downloadable files or to an anchor (within the same
page or in another site page).
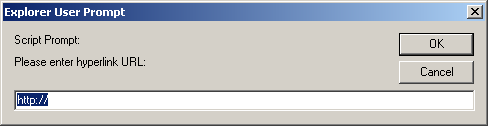
If you click the button icon
(its tooltip is Link), a window will pop-up
requiring you to enter the URL for the link:
Once you fill it in, click OK and the link
will be inserted in page. If no selection (text, image) had been made
before you clicked this button, the specified URL will be inserted in
page as a link. If a selection had been made, it will become link to the
entered URL.
Note: If you want to create a link to an anchor in the same
page, simply enter "#" followed by the anchor name in the URL
text box. If the anchor is not in the same page, enter "#" and
the anchor name after specifying the URL.
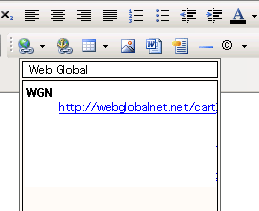
If you click the arrow on the right (its tooltip
is Hyperlink Picker), a drop-down menu with
predefined links will show. On the first row, enter a piece of text (at
least one letter) of interest for the link you want to insert. Depending
on your input, the list of options (links) below varies. The options contain
in their name the entered text, which is highlighted:
By selecting one of them, a link to that URL, and with the name displayed
in the drop-down menu (if no selection had been made), will be automatically
inserted in your page. If a selection had been made, it will become link
to the selected URL.
You can also insert a link by using the shortcut
keys "Ctrl+K". The window
asking you to enter the hyperlink URL will pop-up. Proceed as explained
above.
Link Properties
The Link Properties panel is displayed when
you select or click inside a link from your page. It corresponds to the
<A> tag in the Tag Selector:
Note: If there is a link applied
to an image and you want to edit the link properties, the simple act of
selecting the image will not open the Link Properties
panel, but the Image Properties panel. In order
to configure the link, click the <A> tag
in the Tag Selector.
To configure this panel, follow the instructions below:
In the Element ID text
box enter the value for the id attribute. It will
uniquely identify the element (link) in page.
The Target drop-down
menu in the Link Inspector presents the options
for defining the window that will display the targeted page:
normal
new window
current window
current frame
parent frame
custom target... - if you organize your page
in frames, enter the name of the frame where you want the link page to
open.
In the Title text box
enter the tooltip to be displayed when the mouse pointer is placed over
the link (in most common browsers).
By clicking the Remove
Link button, the link associated to the current selection (text,
image) is removed.
In the Link text box
you can edit the URL address of the targeted page. By clicking the Browse for File button to the right,
the Remote
File Explorer window opens and you can select the file on the
remote server to which the current link should point.
Copyright
1991- 2025
Web Global Net All Right Reserved. 800-768-6024 • Terms of Use